How to Automate Your Lead Generation Flow with Airtable
- The Smart Business

- Dec 15, 2023
- 4 min read
In this article, we'll look at how you can use Airtable to automate your lead generation process. We'll discuss how to create forms and automate to send a message on a Slack channel, as well as how to manage and store the data you receive. We'll also share some tips on how to maximize the effectiveness of your lead generation flow.
What is Airtable?
Airtable is a powerful organizational tool that allows you to manage and store data in a spreadsheet format, making it an ideal choice for businesses. With an intuitive and user-friendly UI, it is easy to organize and retrieve data, saving users time and effort. In addition, Airtable is popular among businesses because of its ability to integrate with forms. This integration allows users to quickly generate leads without the hassle of manual data entry.
By connecting forms to Airtable, users can automatically capture data from their leads and store it in Airtable. This automation allows users to improve their workflow and focus on more important tasks, rather than having to manually input data.
Airtable also supports collaboration, with users able to share data and collaborate in real-time. This feature makes it a great choice for businesses who need to collaborate on projects, such as data analysis and reporting. With all these features, Airtable is a powerful organizational tool that can help businesses save time and focus on their most important tasks.
How to generate leads with Airtable
Generating leads with Airtable is easy and efficient. Here’s a step-by-step guide on how to generate leads with Airtable:
Create a form containing the information you want to collect from your leads.
Connect the form to an Airtable base.
Once the lead data has been captured and stored in Airtable, you can use the data to create targeted campaigns and track the progress of your leads.
Let’s get started by creating your Airtable base and columns in Grid view. Make sure you add all fields that you need as part of your lead generation form.

Then click on the Form under Create… to create your form based on your Grid view. You can customize your form based on your Airtable plan. You can get a link for your form by clicking on Share form button or preview with the Open form button. You can also remove fields like Assignee and Status that you don’t want your potential customers to see. Drag them out of the form and drop under the Fields column.

After you’re done with your form, it’s time setup the automation flow.
How to automate lead generation flow with Airtable
Airtable’s built-in automation feature allows you to take many actions with the help of 3rd party app integrations like Slack, MS Teams, Gmail, Google Docs (Pro feature), Google Forms, Google Sheets, Outlook, Twitter, Facebook Pages, GitHub Issues, and more. With Airtable automation feature you can create a workflow to automate the process of tracking and managing leads, set up notifications and reminders to ensure all leads are followed up on in a timely manner. You can also create advanced flows with 3rd party apps like Zapier in which will cover in our future posts.
Before we get into the details, here are some reasons why you should automate your lead generation process with Airtable:
Automating your lead generation flow can help you save time and effort, as it eliminates the need for manual data entry.
This allows you to quickly capture leads and store them in Airtable.
With this automation, you can create targeted campaigns and track the progress of your leads.
Automating your lead generation flow allows you to set up notifications and reminders to ensure all leads are followed up on in a timely manner.
This automation can help you improve your workflow and focus on more important tasks.
At a glance, below are some other things you can do with Airtable’s automation feature:
Send an email
Send a Slack or Microsoft Teams message
Create or update a record
Create a calendar event
Send a tweet or post on a Facebook page
Integrate with Salesforce (Enterprise feature)
Send a weekly digest
Generate a weekly digest in Google Docs (Pro feature)
Now let’s automate our lead generation flow with Airtable. Here you can use preset automation flows or create your own from scratch. If you prefer to use a preset flow, make sure to edit Triggers and Actions per your need and Airtable base.
Let’s say we want to send a Slack message to our sales team’s channel. To do that, navigate to Automate tab on your Airtable base.
We’ll start by adding a Trigger. Pick “When a form is submitted” since we’re trying to automate leads that’s captured recently. Under the Configuration tab, choose your table and form, then click on Use suggested record or Choose record to validate and preview your setup.

Now is the time to add an Action. We’ll send a message to Slack to notify our #sales channel. To do that, click on Slack: Send a message and connect your Slack account under Slack account. After connecting your Slack account, you’ll be able to see Channel/User as a new option. Pick your channel or specific user (i.e. #sales, #facebookads) and customize your message and bot’s options.

Pro tip: List all/some form fields automatically
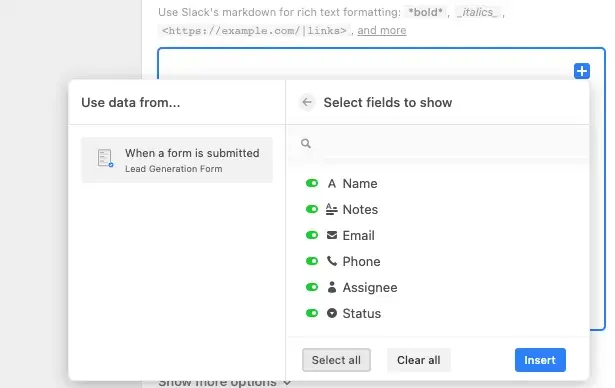
If you want to list all fields in your message, you can do this via List dynamic field after clicking on + icon inside the Message box.


You can select or unselect fields/columns based on your need under List options.
After you’re done configuring your Slack options, click on Generate a preview to see how it looks like.

If all looks good, turn on your flow by switching the OFF button to ON. And enjoy the ride! It’s ready to go.


Comments